Overview
This guide walks you through the digital integration between the Delsys Trigno systems and Qualisys Track Manager (QTM 2025.1+). The goal is to stream EMG data directly into QTM and time-synchronize it with motion capture. You will learn how to install the Delsys QDevice plugin, configure sensors in Trigno Discover, wire the Qualisys Camera Sync Unit to the Delsys Trigno System, and set up start-triggered capture in QTM.
Requirements
Material/Tool | Description |
|---|---|
Software | Trigno Discover v2.0.1.3+ QDevice v1.0.2+ |
Hardware: System | Trigno Centro Trigno Research Base Station Qualisys Camera Sync Unit |
Firmware: System | Trigno Centro: 06-05-00 | 04-01 + Trigno Research Base Station: Digital: 2919 | 1506 | 0806 | 2008 | 0000 Analog: 2919| 1506 | 0806 | 2008| 0901 |
Hardware: Sensors | Avanti-Style Sensors |
Firmware: Sensors | Avanti-Style Sensor: 40-49 Maize Sensor: 60-29 |
Operating System | Windows 11 |
Accessories | BNC (male) to BNC (male) cable |
User Account Permissions | Windows admin rights to install QTM and the QDevice plug-in |
Step-by-Step Guide
Step 1: Install Software
1. Install/verify Trigno Discover v2.0.1.3+ (See Trigno Discover: License Management & Installation).
2. Install/verify QTM v2025.1+ (from Qualisys downloads).
3. Download and install the Delsys QDevice plugin DelsysTrignoQDevice.exe) from the Delsys site. The installer automatically places the required files in C:\Program Files\Qualisys\Qualisys Track Manager.
Important
Ensure both Discover and QTM versions meet the minimum listed above.
Step 2: Pair & configure sensors in Trigno Discover
Connect the Trigno System to power and USB, then launch Trigno Discover.
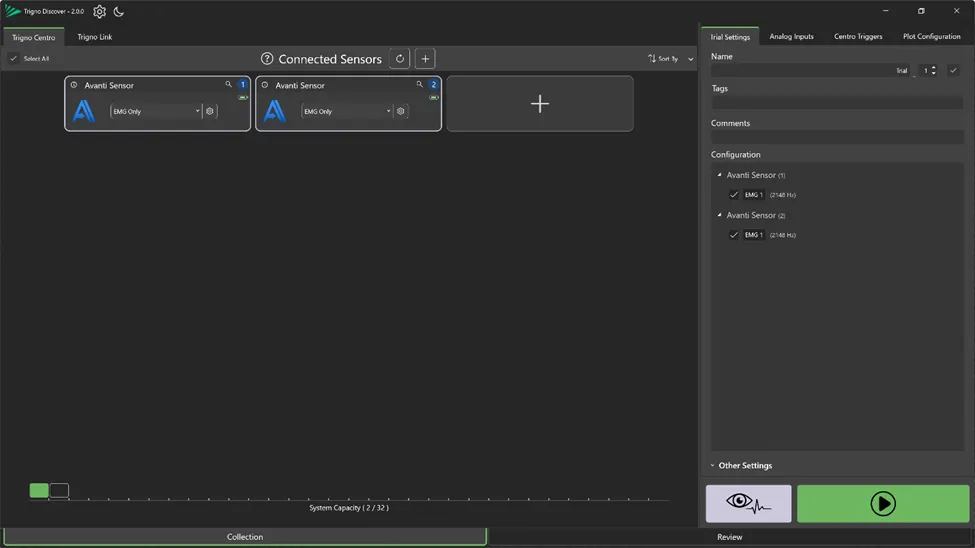
Pair sensors: use Add Sensor (first-time) or Scan for Sensors (previously paired). (see Trigno Discover: System Configuration for more information)
Configure sensor names, channel labels, and modes. Channel names must be renamed in Trigno Discover.
Run a short Preview to save the configuration.
Close Trigno Discover once configured.
Important
Trigno Discover must be closed before opening QTM
QTM imports the sensor/channel configuration from Discover. Changes only carry through after a preview or collection is run. See Trigno Discover: Trial Setup
Step 3: Hardware and Triggering Configurations
The Delsys QDevice integration supports both the Trigno Centro and Trigno Research Base Station. Either system can be used, but the hardware and triggering configuration will differ depending on which system is being used.
Option A: Trigno Centro
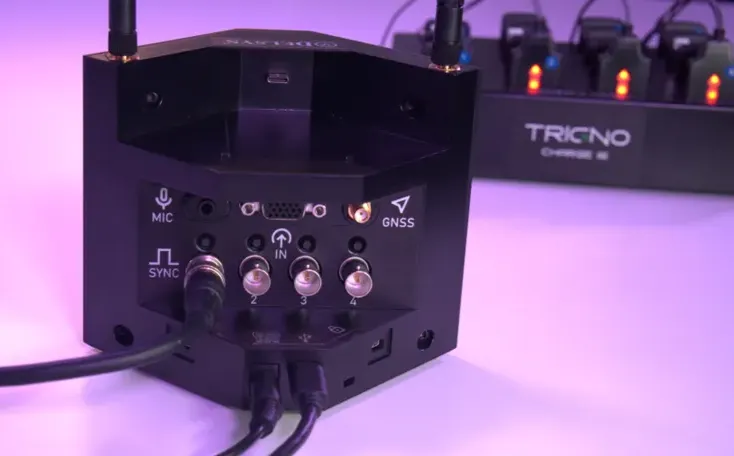
Power Trigno Centro and connect the device to the computer via the supplied USB Cable. Ensure Trigno Centro has completed the hardware boot process before moving onto the next step (The LED lights should remain solid Orange. See Trigno Discover: System Configuration for more information).
On Trigno Centro, connect one end of the BNC to BNC cable to Sync Port 1.
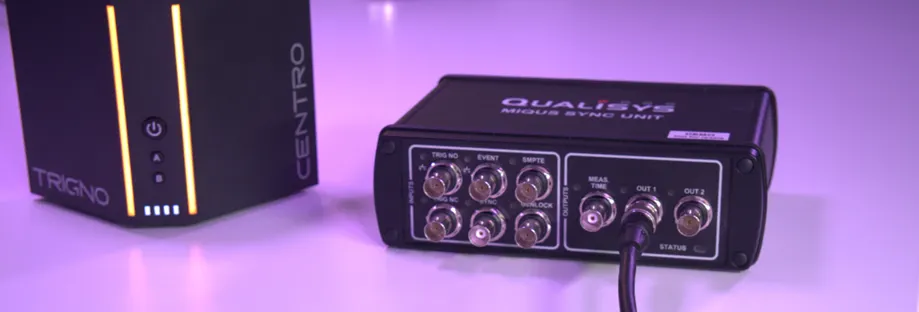
Connect the other end of the BNC cable to the Out 1 or Out 2 port on the camera sync unit.
If you are synchronizing through an Oqus camera instead of through a camera sync unit, plug the cable into the “Sync out” connector of the sync/trig splitter, and plug the splitter into the control port on the back of the camera
Important
The BNC cable should not be connected to the Sync Port until after the system has been fully powered on
Information
The triggering configuration allows QTM send a 5V start pulse to Centro so the first Qualisys frame and first EMG sample occur at t = 0 s.
Option B: Trigno Research Base Station
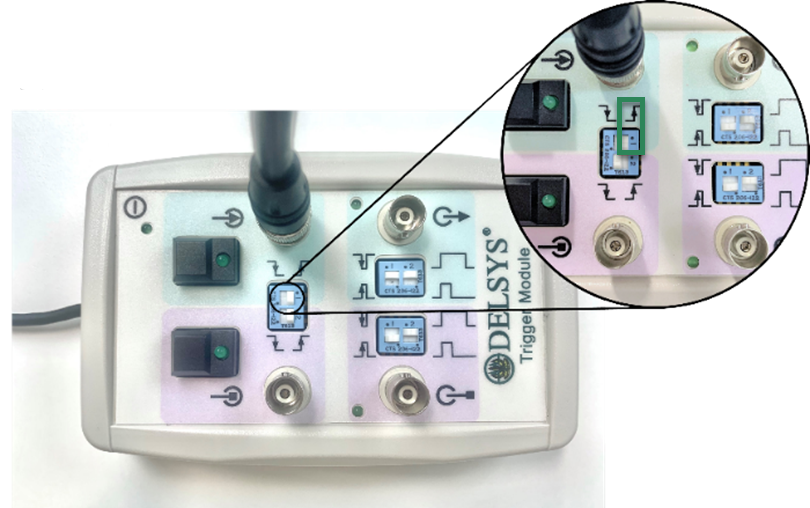
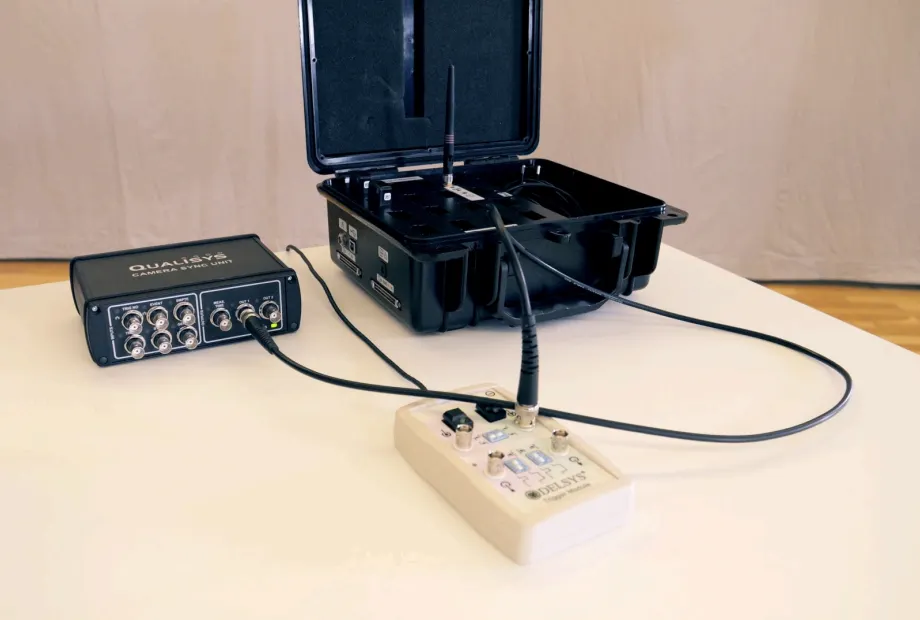
On the Trigno Research Base Station, connect the Delsys Trigger Module to the Trigger Port via the LEMO Connector. Ensure the red dot of the LEMO connector points towards the bottom of the Trigno Research Base Station when connecting.
Plug one end of the BNC cable into the Start Input port on the Delsys trigger module.
Connect the other end of the BNC cable to the Out 1 or Out 2 port on the camera sync unit.
If you are synchronizing through an Oqus camera instead of through a camera sync unit, plug the cable into the “Sync out” connector of the sync/trig splitter, and plug the splitter into the control port on the back of the camera
Step 4: Add the Delsys System in QTM
Launch QTM 2025.1+.
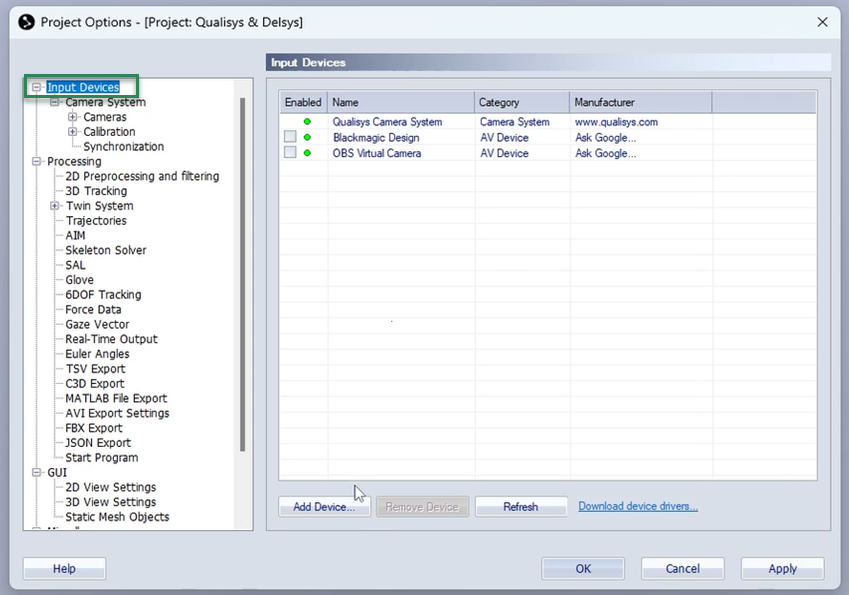
Go to Project Options → Input Devices → Add Device.
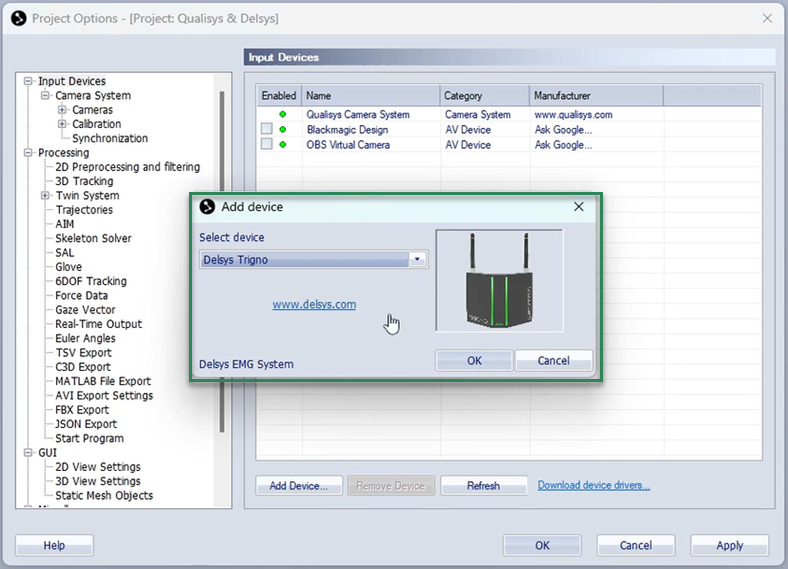
From the Select Device dropdown, choose Delsys Trigno (not API/SDK).
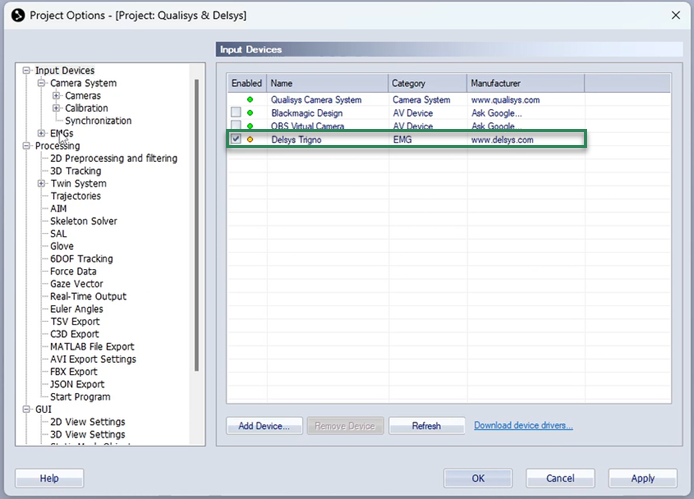
Check the Enabled box
Information
Only the Delsys Trigno option is compatible with Centro.
Step 5: Synchronize Settings in QTM
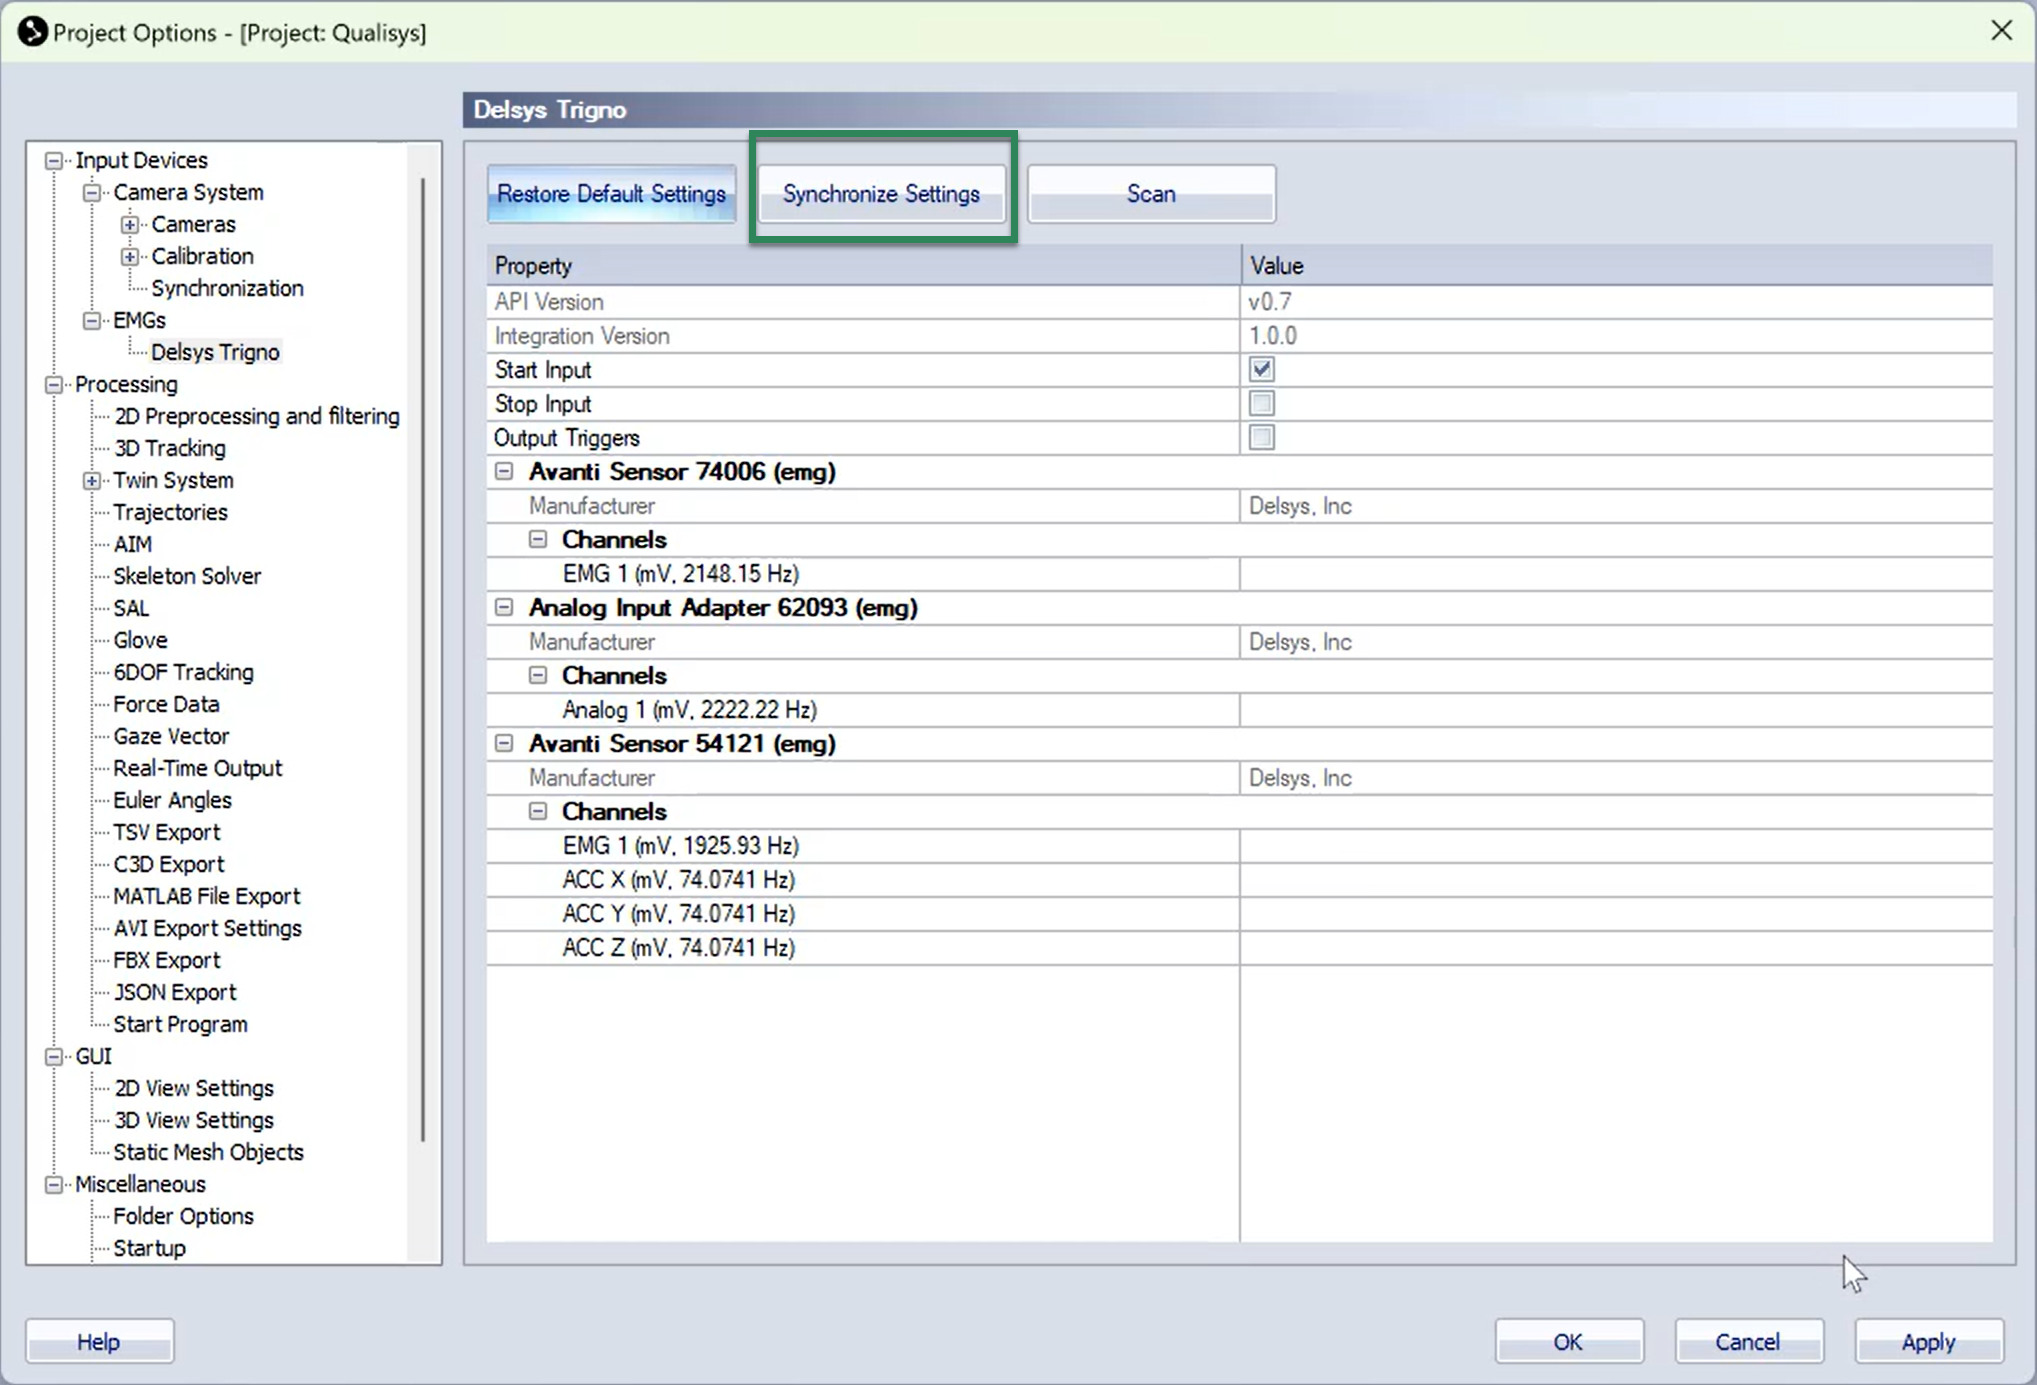
In Project Options → Input Devices → EMGs, expand the Delsys Trigno entry.
Click Synchronize Settings.
Sensor list appears with names, IDs, battery %, and channels.
Important
A popup may appear. Remove this by selecting “Switch To”, waiting a few seconds, then close the panel to complete the scan.
Step 6: Configure Trigger Settings in QTM
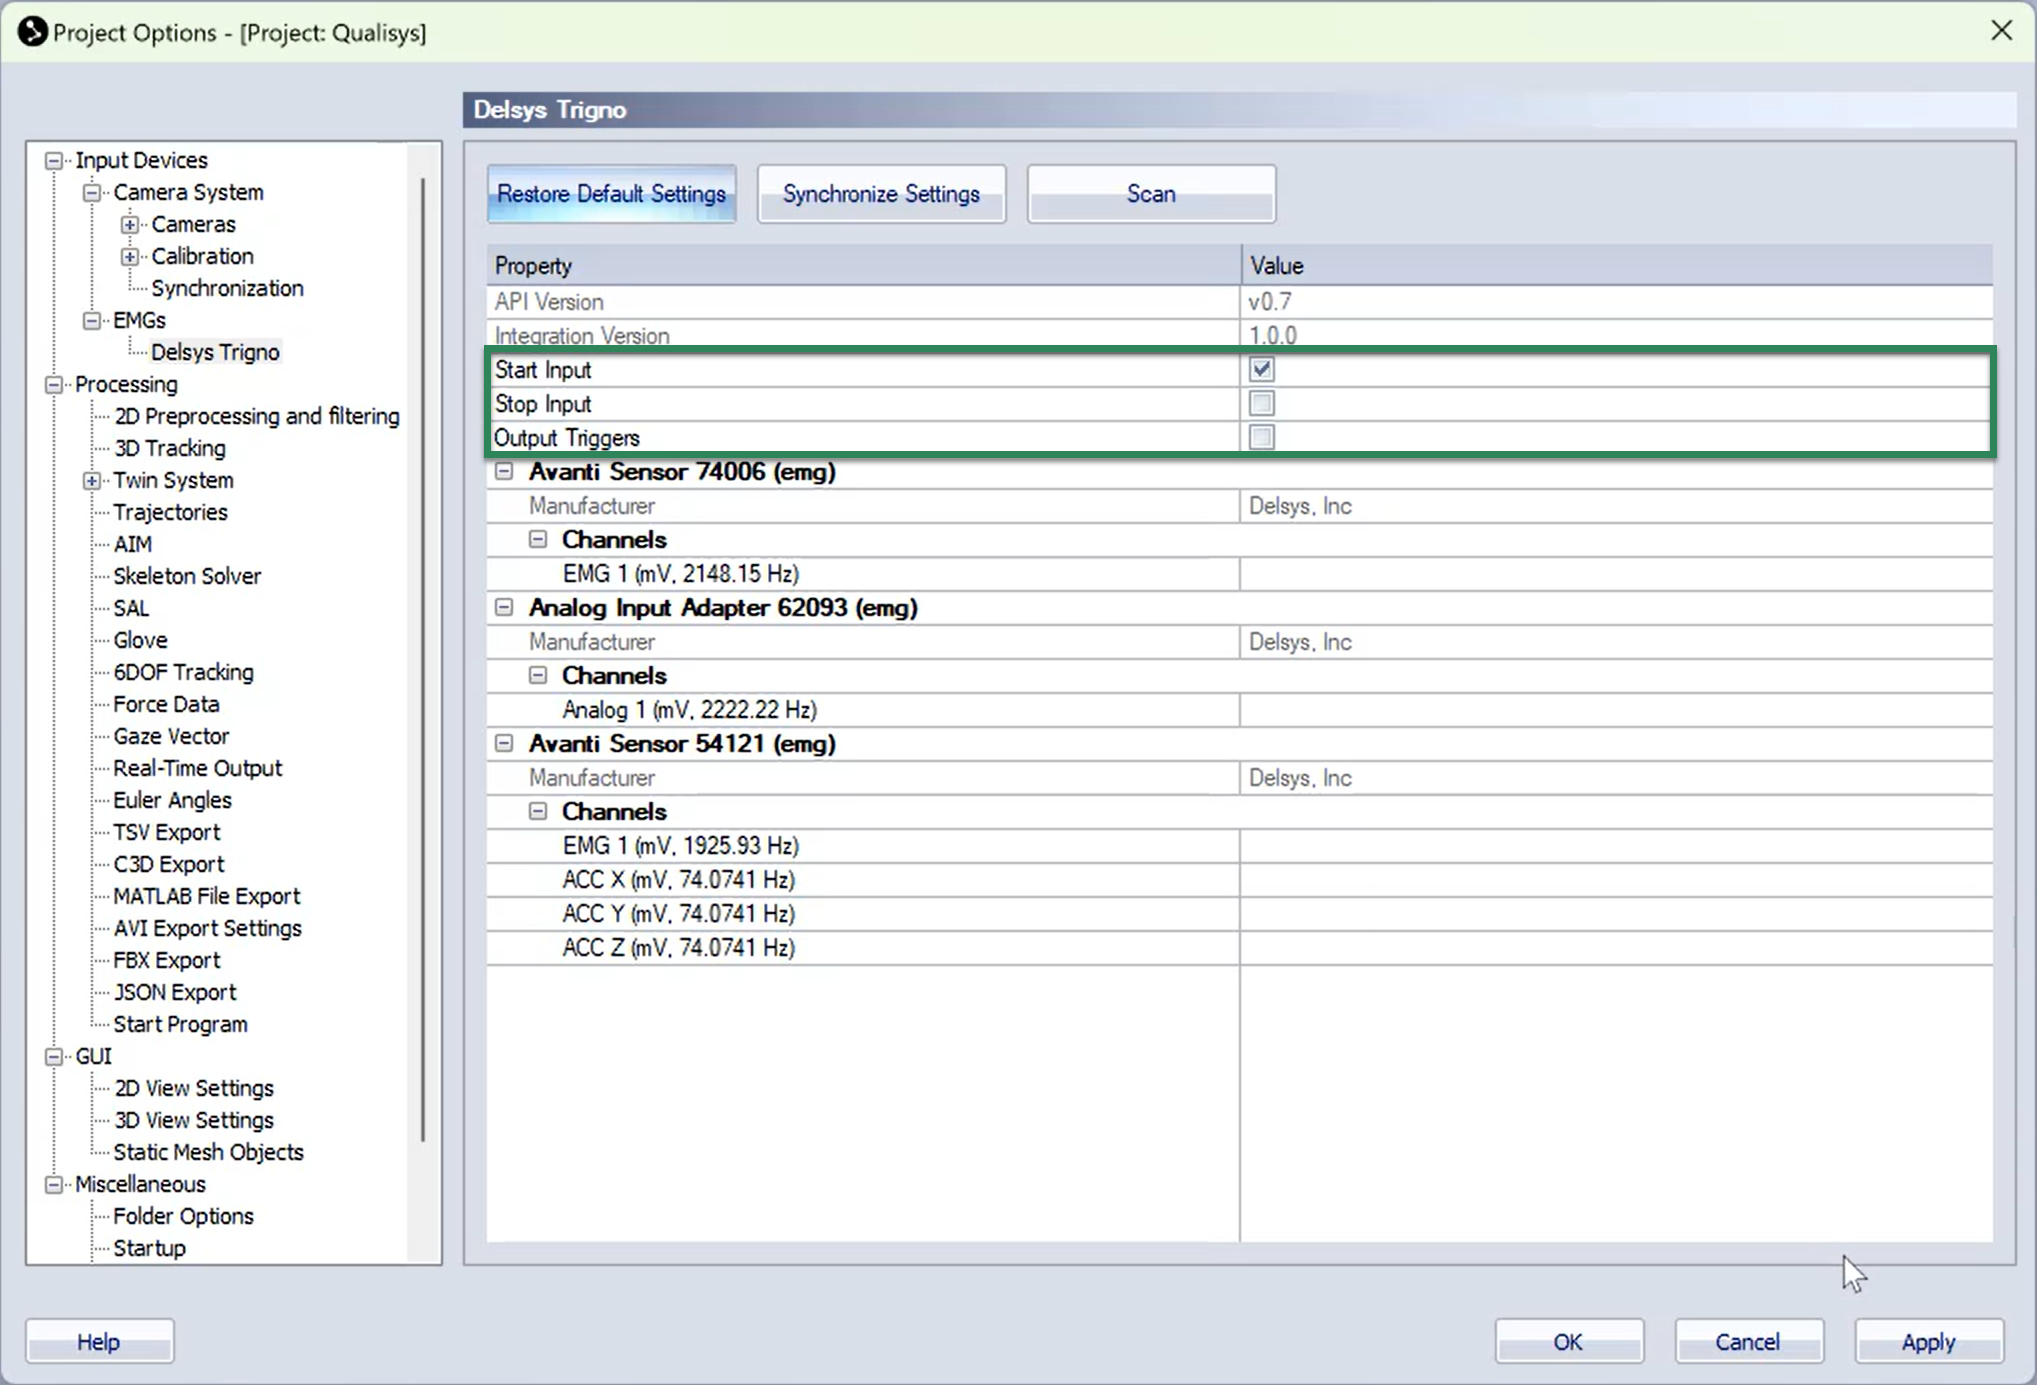
In the Delsys Trigno device options, check Start Input Trigger and click Apply.
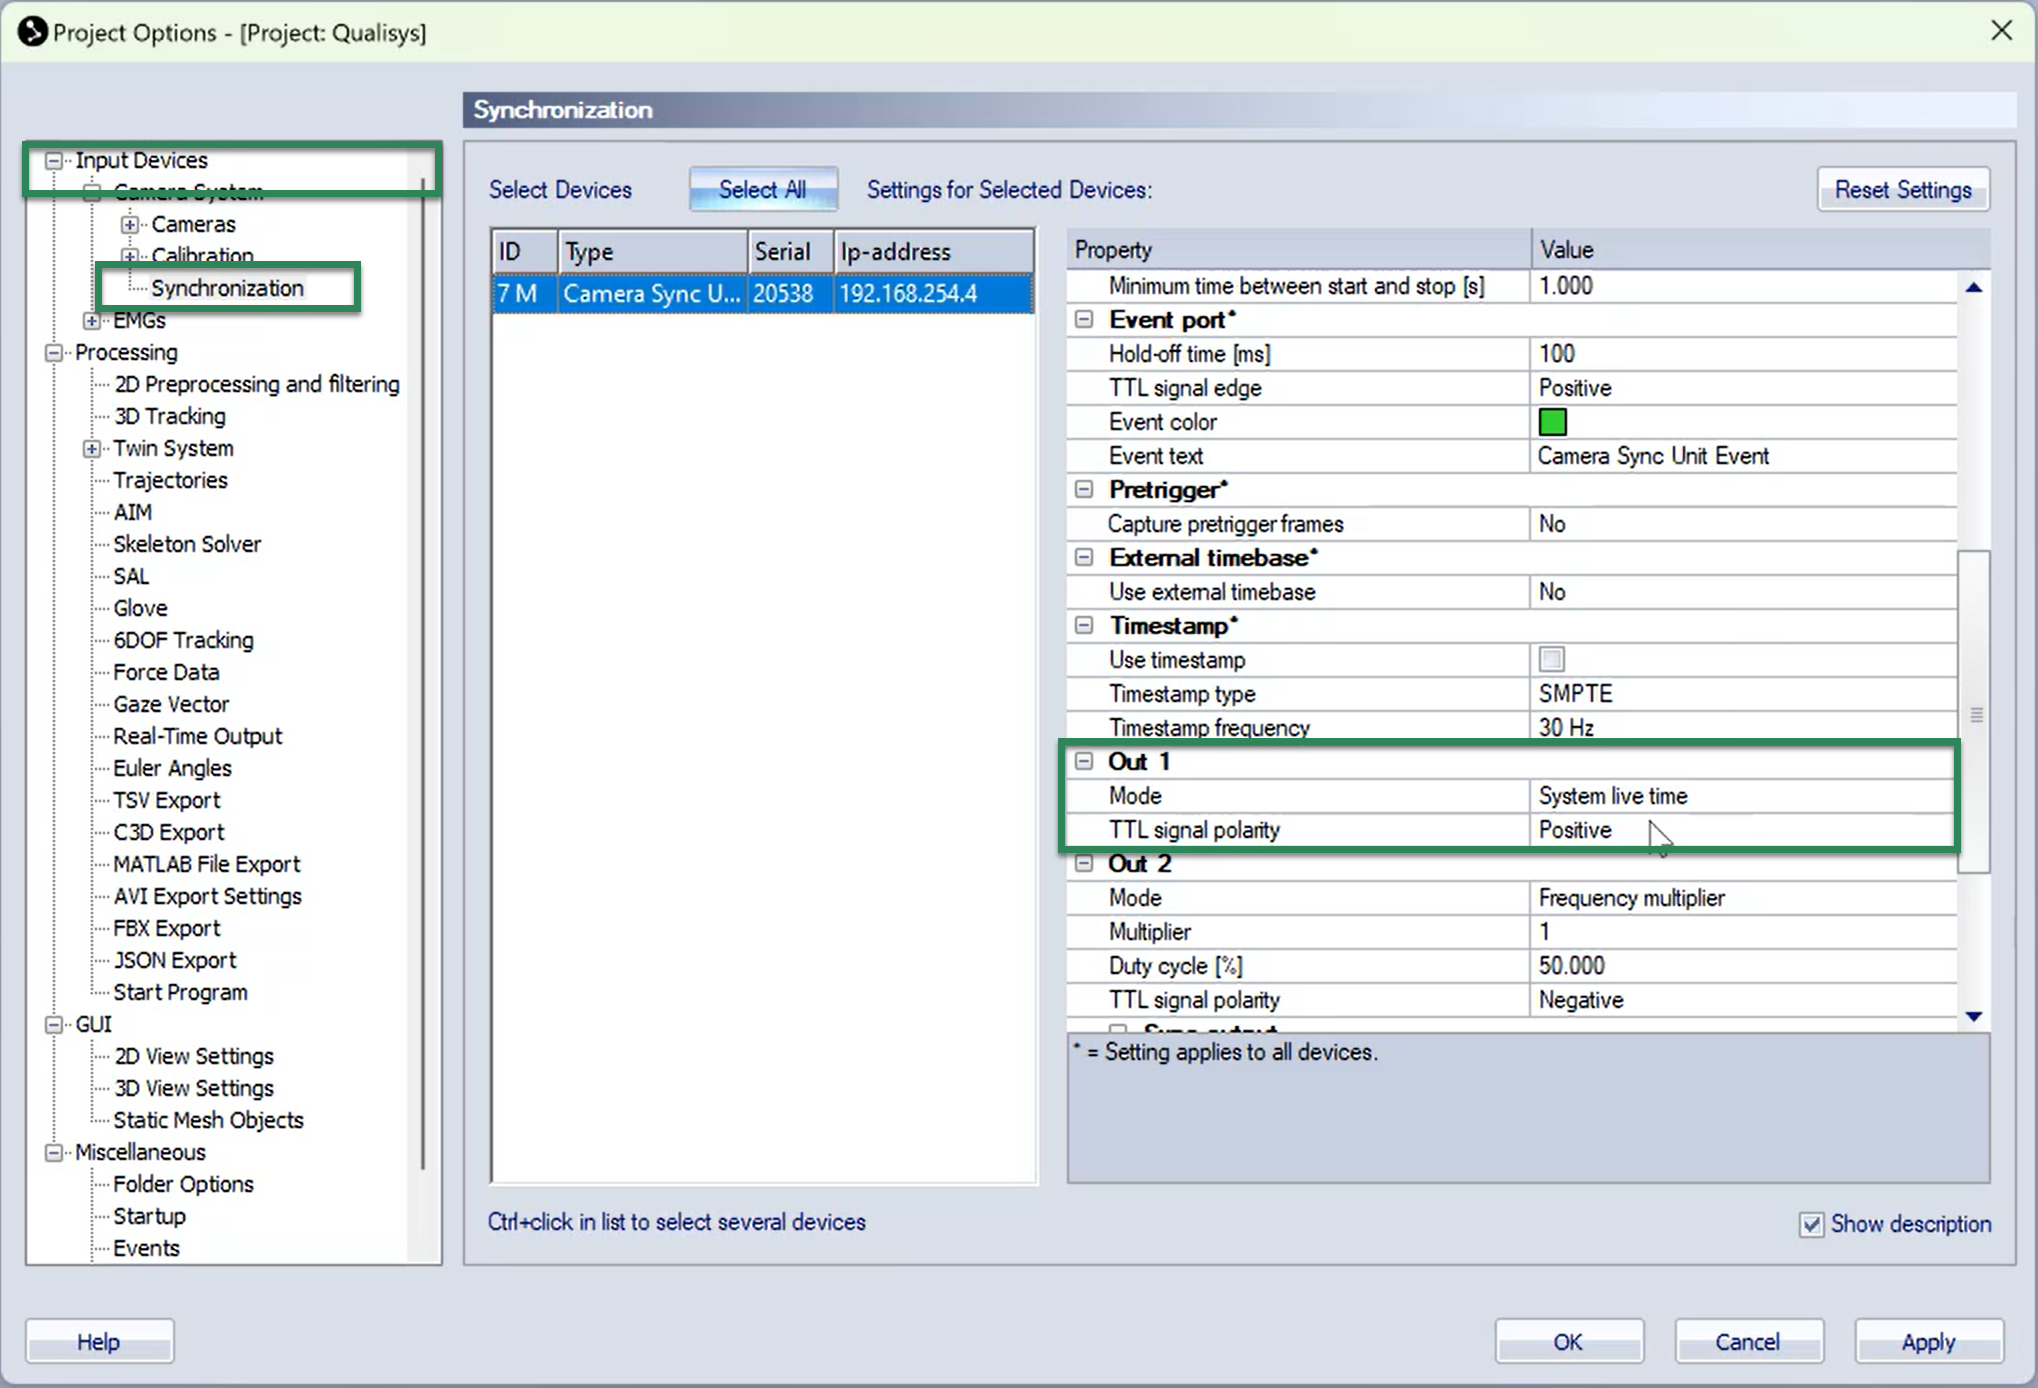
Go to the Synchronization tab under Input Devices:
Set OUT 1 mode = System live time.
Set TTL signal polarity = Positive.
Apply and confirm settings
Important
Centro’s LED will change from light blue → dark blue when the trigger pulse is successfully received
The LED’s on the black buttons of the trigger module will flash when a signal is received.
Information
If using the Trigno Research Base Station, the TTL signal polarity setting should match the input edge that is set on the Trigger Module.
Falling edge = Negative polarity
Rising edge = Positive polarity
Step 7: Capture & Verify Synchronization
In QTM, click Start Capture.
QTM sends a 5V pulse to the Trigno Receiver.
The Trigno Receiver starts EMG acquisition, streaming data directly into QTM.
Verify EMG signals alongside motion capture data in the live panes.
Confirm synchronized data alignment during review/export.
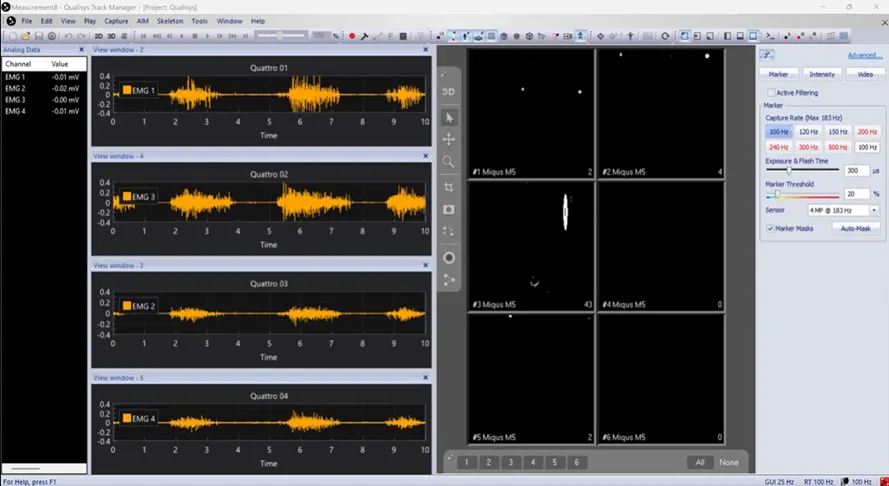
You are now integrated! Delsys EMG data streams into QTM in real time, aligned at frame zero with Qualisys motion capture data.
DOC-677-1-0

