
Overview
This guide walks you through setting up and running the Delsys API Python Example Code, which enables direct communication with Delsys Trigno systems and integration with third-party software for data collection, visualization, and export. It is designed for developers and researchers to pair and configure Avanti-Style Sensors, stream and plot EMG data in real time, and export the results to CSV for analysis. You will learn how to install the required tools, activate your API license, set up the development environment, and run the demo application to acquire and save sensor data.
Interactive Guide
For a step-by-step walk-through on installation steps, please refer to the interactive guide below
Statement of Expectation
"Delsys will provide support for the API to the point where the Python Example code is running, and data can be visualized within the GUI. Delsys does not provide support for custom coding projects or assistance with troubleshooting errors within code outside the scope of the Python example code.”
System Requirements
Material/Tool | Description |
|---|---|
Software | Delsys API 2.8.1+ Python 3.12.0+ VSCode 1.97 (recommended) |
Hardware: System | Trigno Centro |
Firmware: System | Trigno Centro: 06-05-00 | 04-01 + Trigno Lite: 02-02 + Trigno Research Base Station: Digital: 2919 | 1506 | 0806 | 2008 | 0000 Analog: 2919| 1506 | 0806 | 2008| 0901 |
Hardware: Sensors | Avanti-Style Sensors |
Firmware: Sensors | Avanti-Style Sensor: 40-49 Maize Sensor: 60-29 |
Operating System | Windows 11 |
Step-by-Step Instructions
Step 1: Installation
Download Example Code
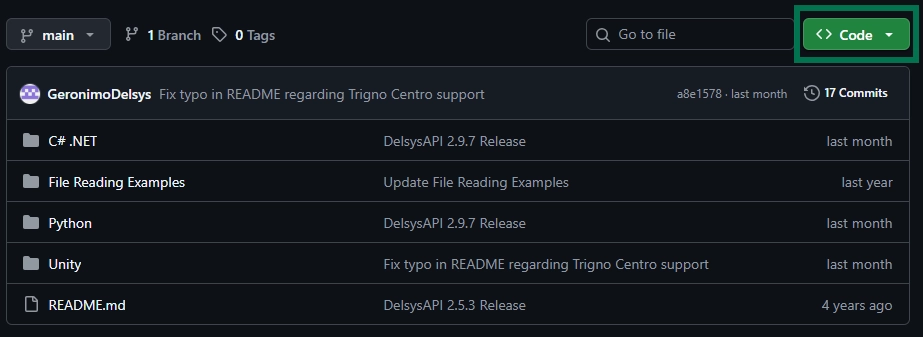
Go to the Delsys GitHub repository.
Click the green “Code” drop-down and select Download ZIP.
Ensure the entire .zip file is downloaded; individual files are not available.
Install Python
The Delsys API 2.8 + Python Example Code requires Python 3.12+.
Python 3.12+ can be downloaded from the official Python 3.12.7 release page
Ensure to install the 64-bit download.
During installation, make sure to check Add to PATH.
Install Visual Studio Code (optional but recommended)
Download Visual Studio Code via the official Microsoft Store listing
. Unblock and Extract Files
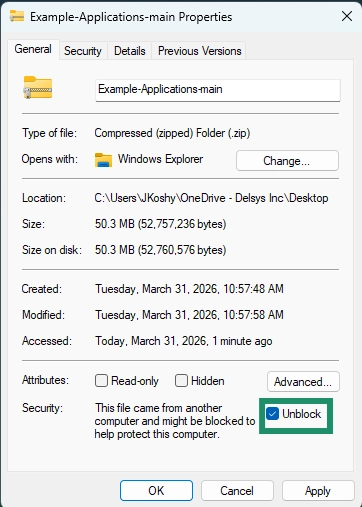
Right-click the downloaded .zip → Properties → check Unblock → Apply → OK.
Right-click again → Extract All → choose destination folder.
Recommendation
Visual Studio Code is recommended for editing and debugging the Delsys API. The Delsys API can be run on any platform that supports running code.
The following steps will be described using VS Code.
Step 2: Initial Setup
Open Project in VS Code
In VS code: File → New Window → Open Folder.
Select the extracted Python folder from your directory.
Install Python Extension for VS Code
If prompted, install Pythonv2024.20.
If not prompted, search for Pythonv2024.20 in Extensions (on the left side menu) and install it manually
Set Up an Environment
You can set up your environment using either the Virtual Environment method (recommended) or the Command Line method.
Option 1: Virtual Environment (Recommended)
Click the Python version indicator in the bottom right of VS Code.
Select Create Virtual Environment → .venv.
Choose Python 3.12.x 64-bit (Global).
Verify that requirements.txt is checked, then click OK.
Option 2: Command Line Install
Open the VS Code terminal (Terminal → New Terminal).
Run the following command: python -m pip install -r requirements.txt.
.gif)
Important
Using a virtual environment is recommended because it installs the Delsys API Python packages locally within your project. This prevents conflicts with other Python projects on your system and ensures that your project uses the correct package versions.
Step 3: Licensing
Obtain License & Key
The Delsys API key/license is separate from the EMGworks and Trigno Discover license. Please contact Delsys Support to obtain a Delsys API license and key.
Insert License & Key
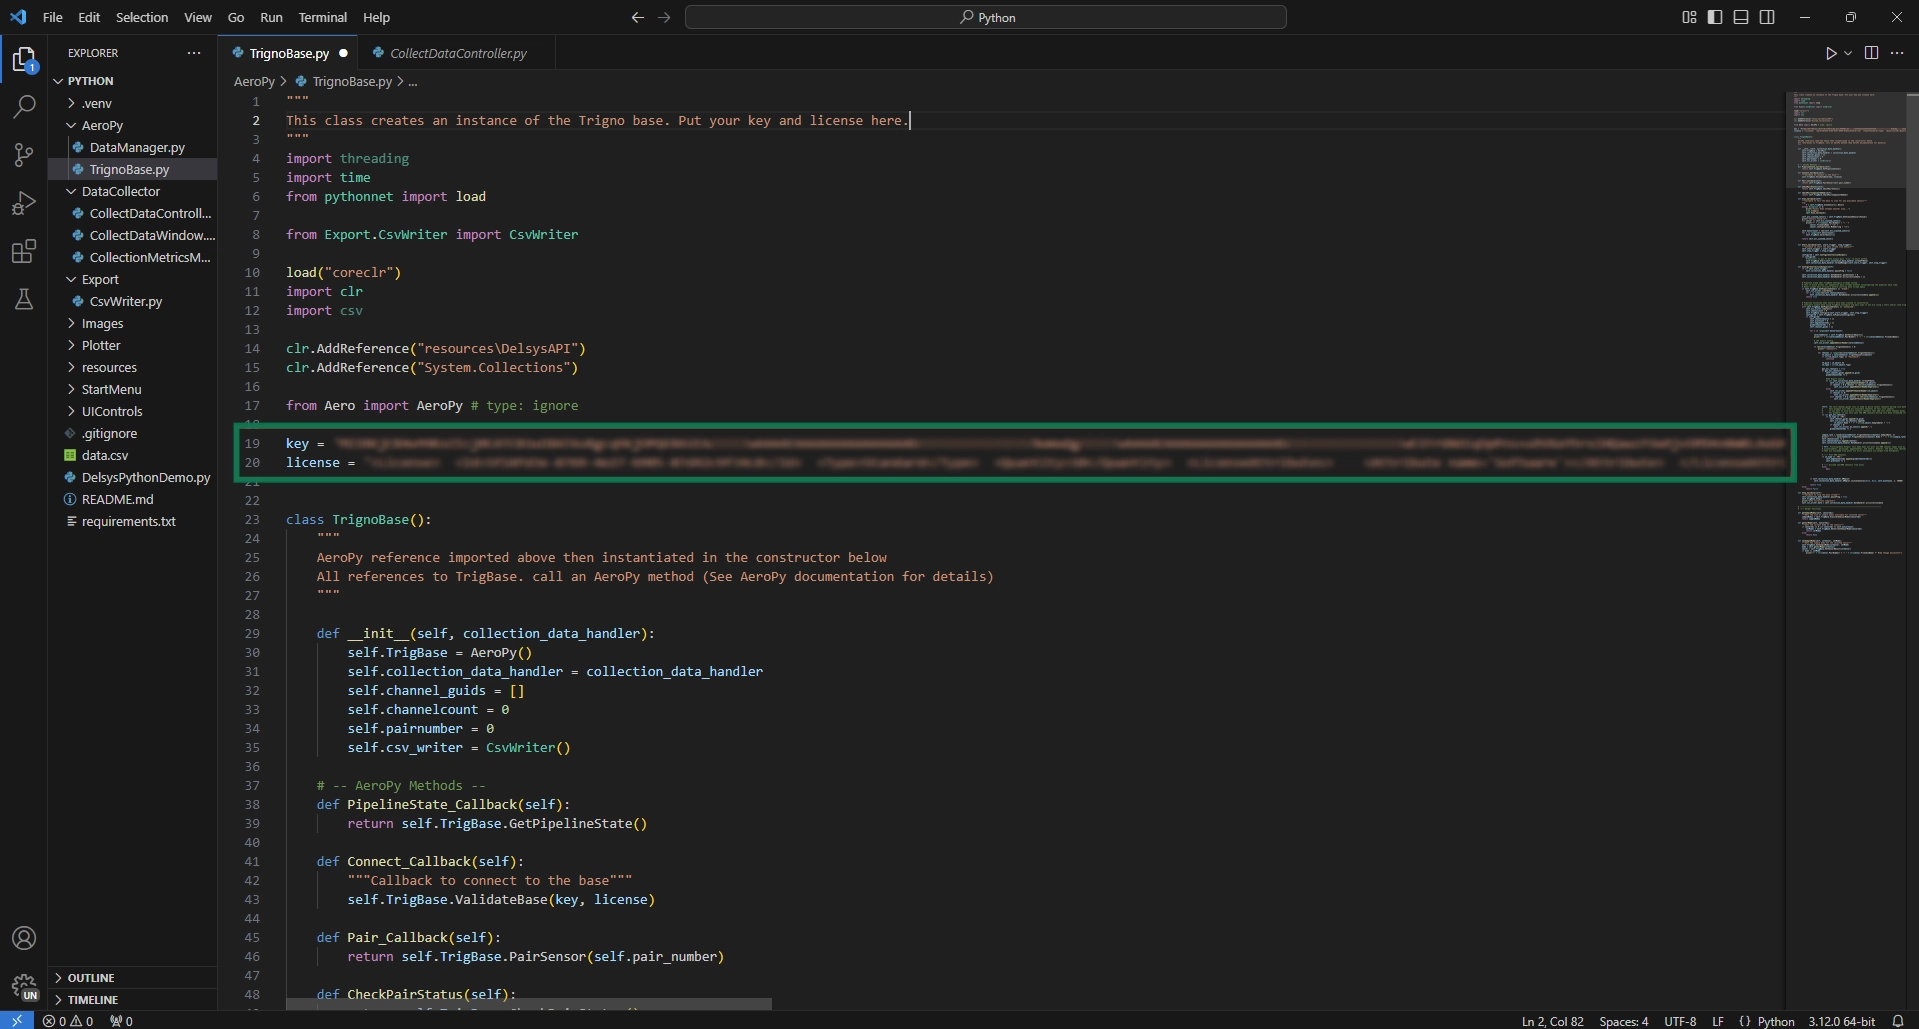
Open
TrignoBase.py(under AeroPy) in VS CodeIn the line mentioning “key”, paste the contents of DelsysAPI.key inside the quotes.
In the line mentioning “license", paste the contents of DelsysAPI.lic inside the quotes
Important
The entire license and key string must be placed within the quotation marks to ensure the Delsys API can read and validate it correctly. Missing or misplaced characters will cause license and key errors.
Step 4: Triggering and Analog Inputs (Trigno Centro Required)
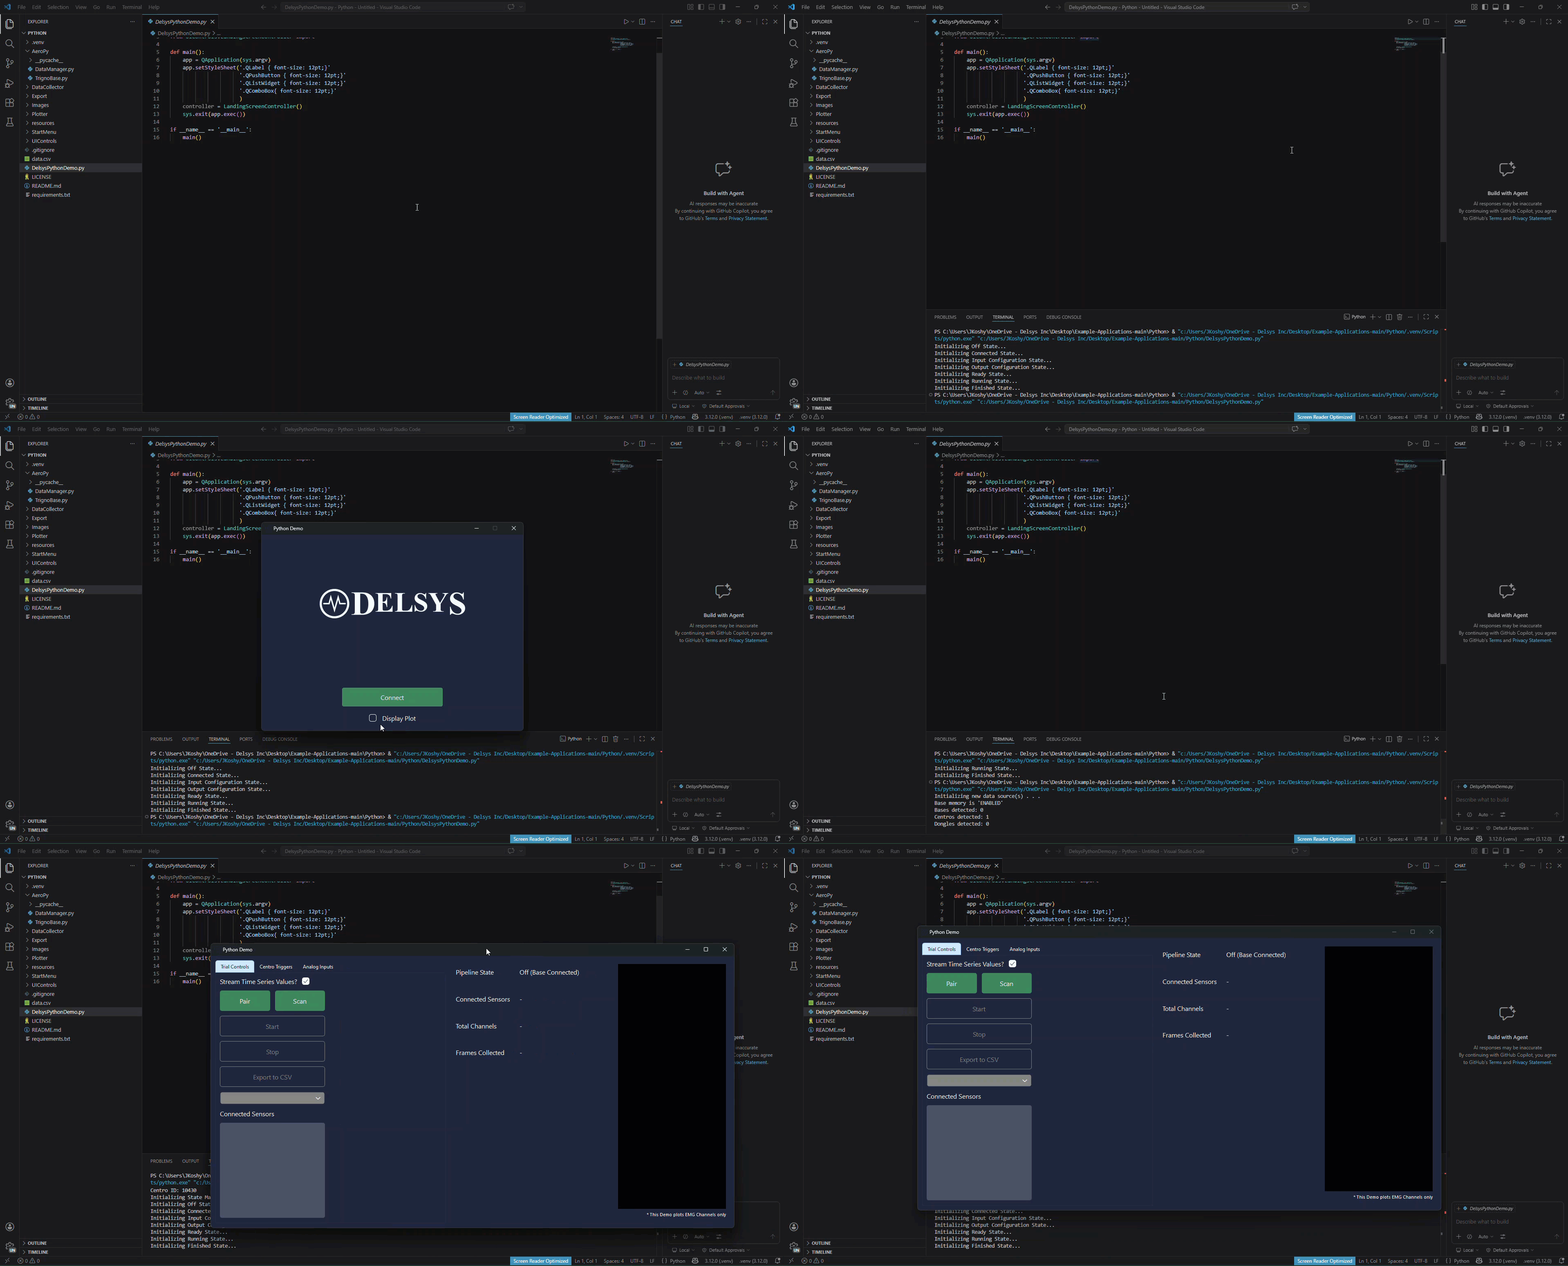
Navigate to the DelsysPythonDemo.py code and click the ”Run Python File” button in the top right corner. The Delsys GUI will display.
Select "Display Plot" (optional) and "Connect" and the "Collect Data GUI" will display.
Triggering
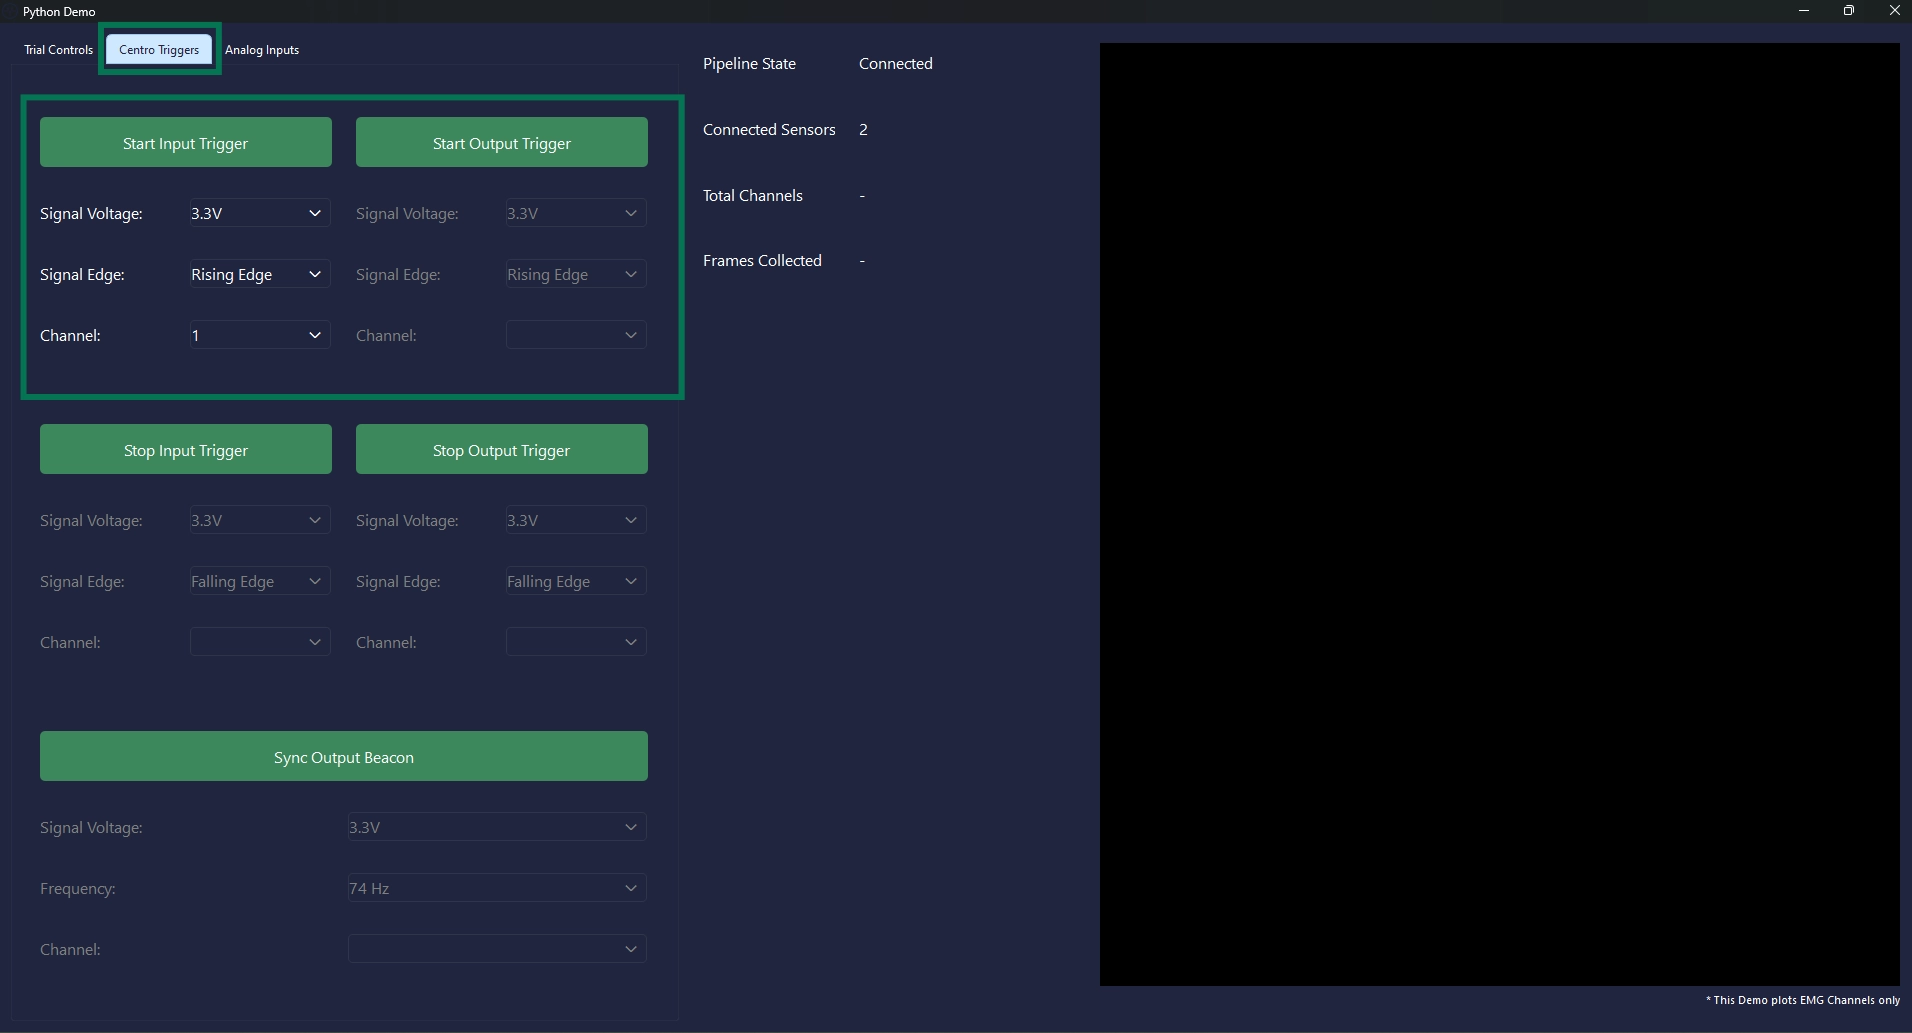
Navigate to the Centro Triggers tab to access trigger settings.
Start and Stop Output/Input triggers can be configured here.
Enable triggers by selecting the trigger header
Configure:
BNC port number (channel)
Rising/Falling edge
Pulse voltage
Information
The Sync Output Beacon option continuously outputs trigger pulses at the specified frequency during the trial.
Analog Inputs
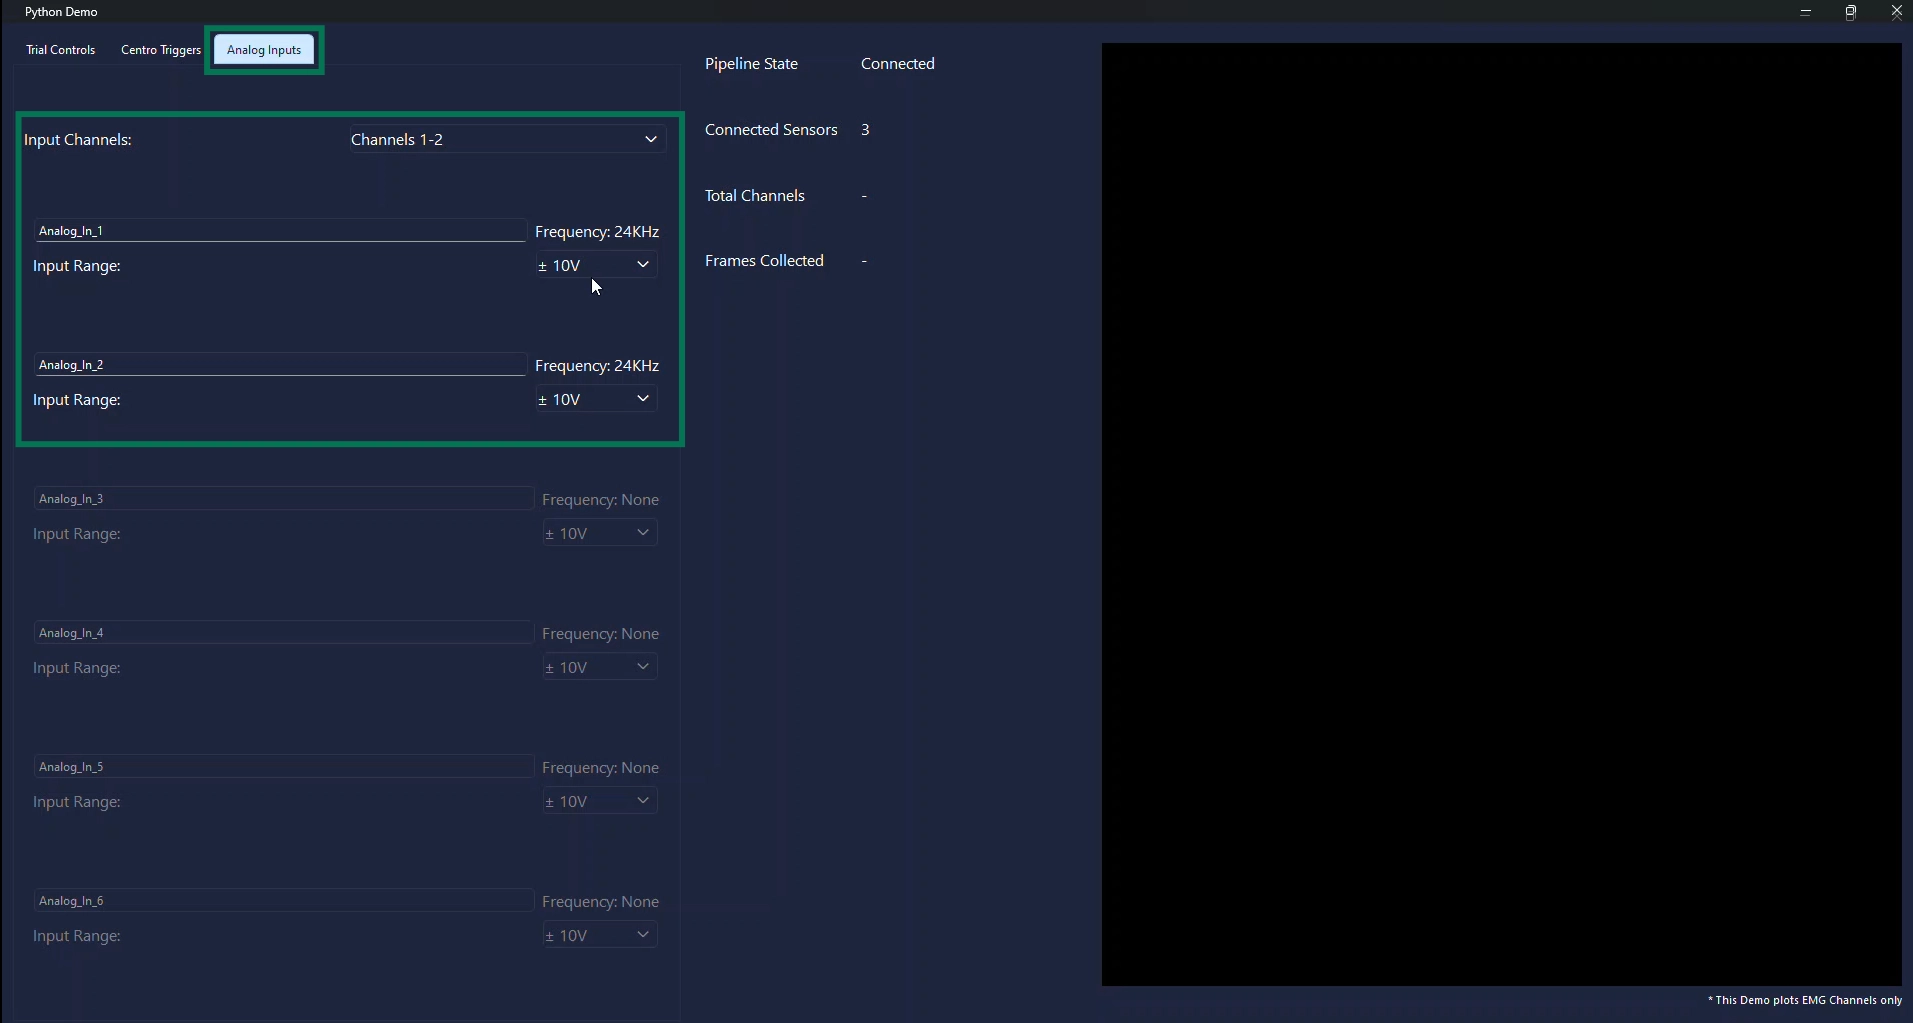
Access the Analog Inputs panel.
Set the number of analog channels by selecting the corresponding header.
Adjust voltage input range from dropdown.
Information
Both Trigger and Analog Input settings should be configured before starting a data collection stream within the GUI.
Step 5: Streaming Data
Navigate to the Trial Controls Tab
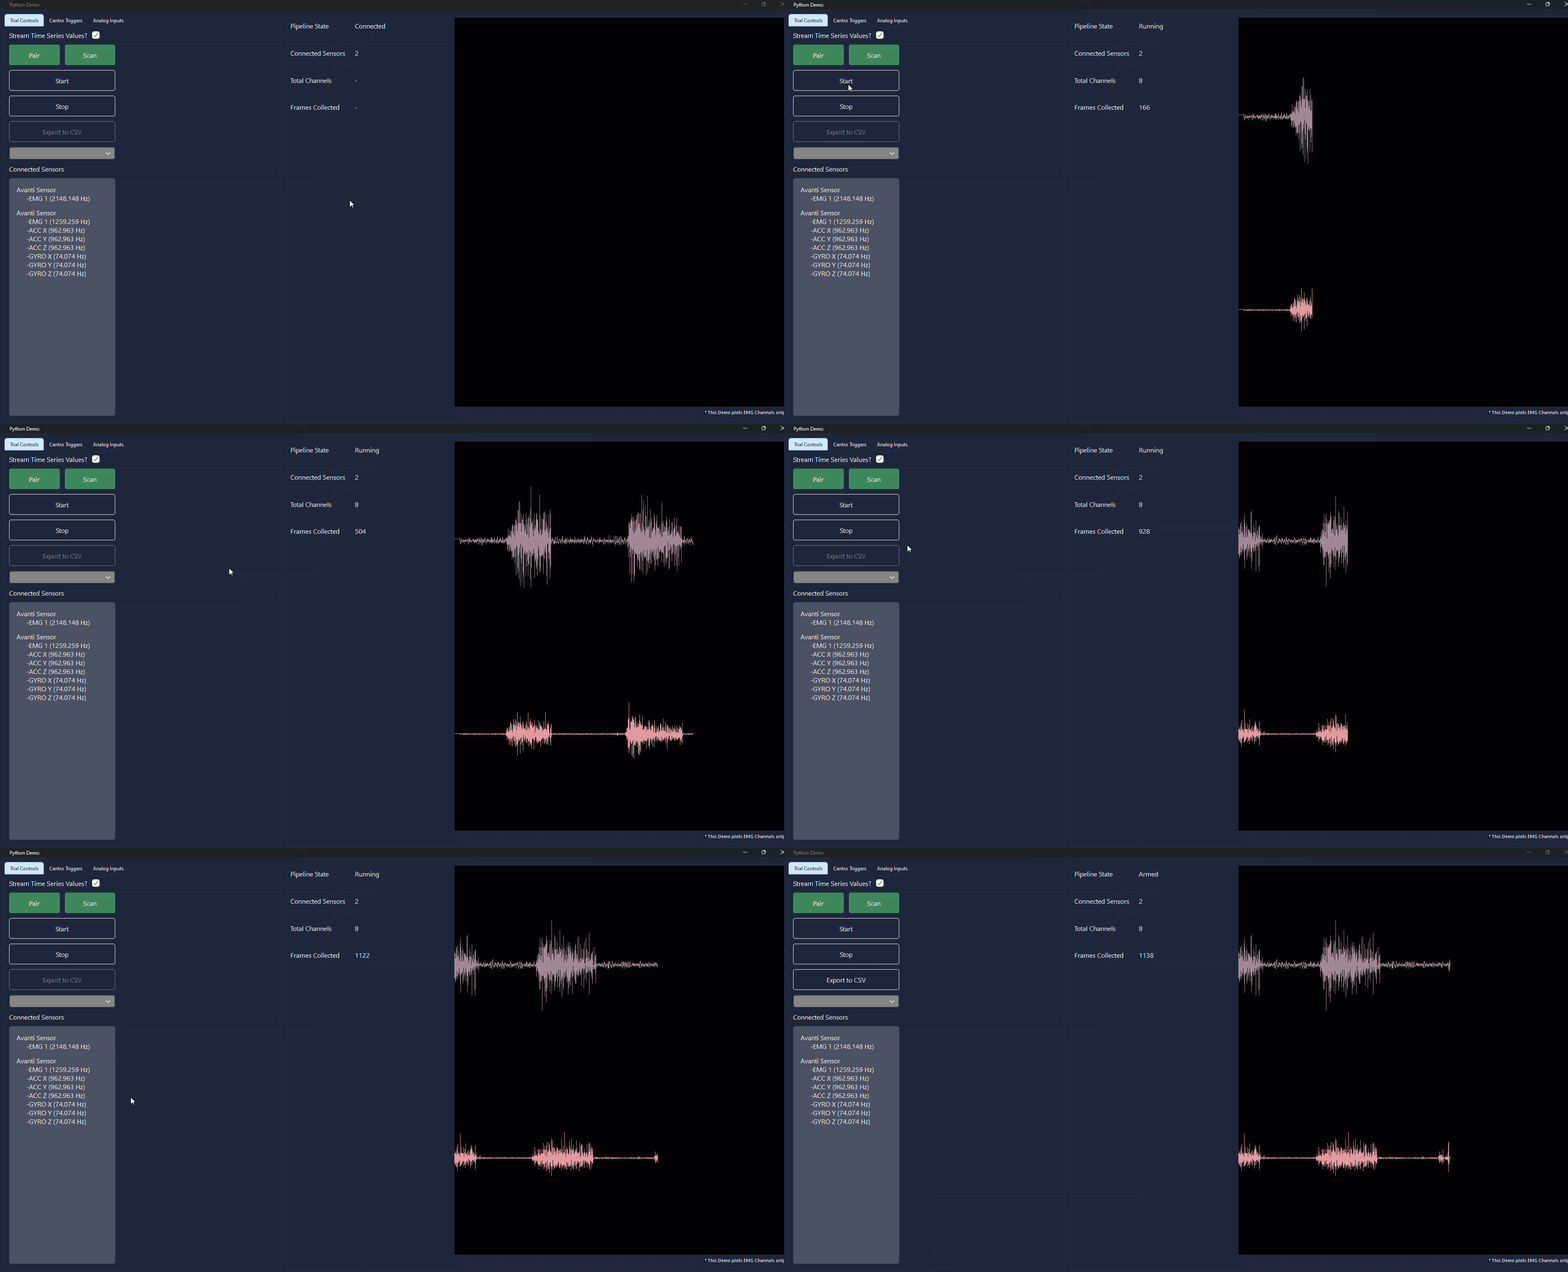
Once sensors have been paired (See How to Activate and Pair Sensors article) and configured, select "Start" and the data will start streaming and plotting, if "Display Plot" has been selected.
Information
Only EMG data is plotted by default in the Python Demo App. However, users can modify the code in
CollectionDataController.pyto visualize other channel types as needed.
Step 6: CSV Export
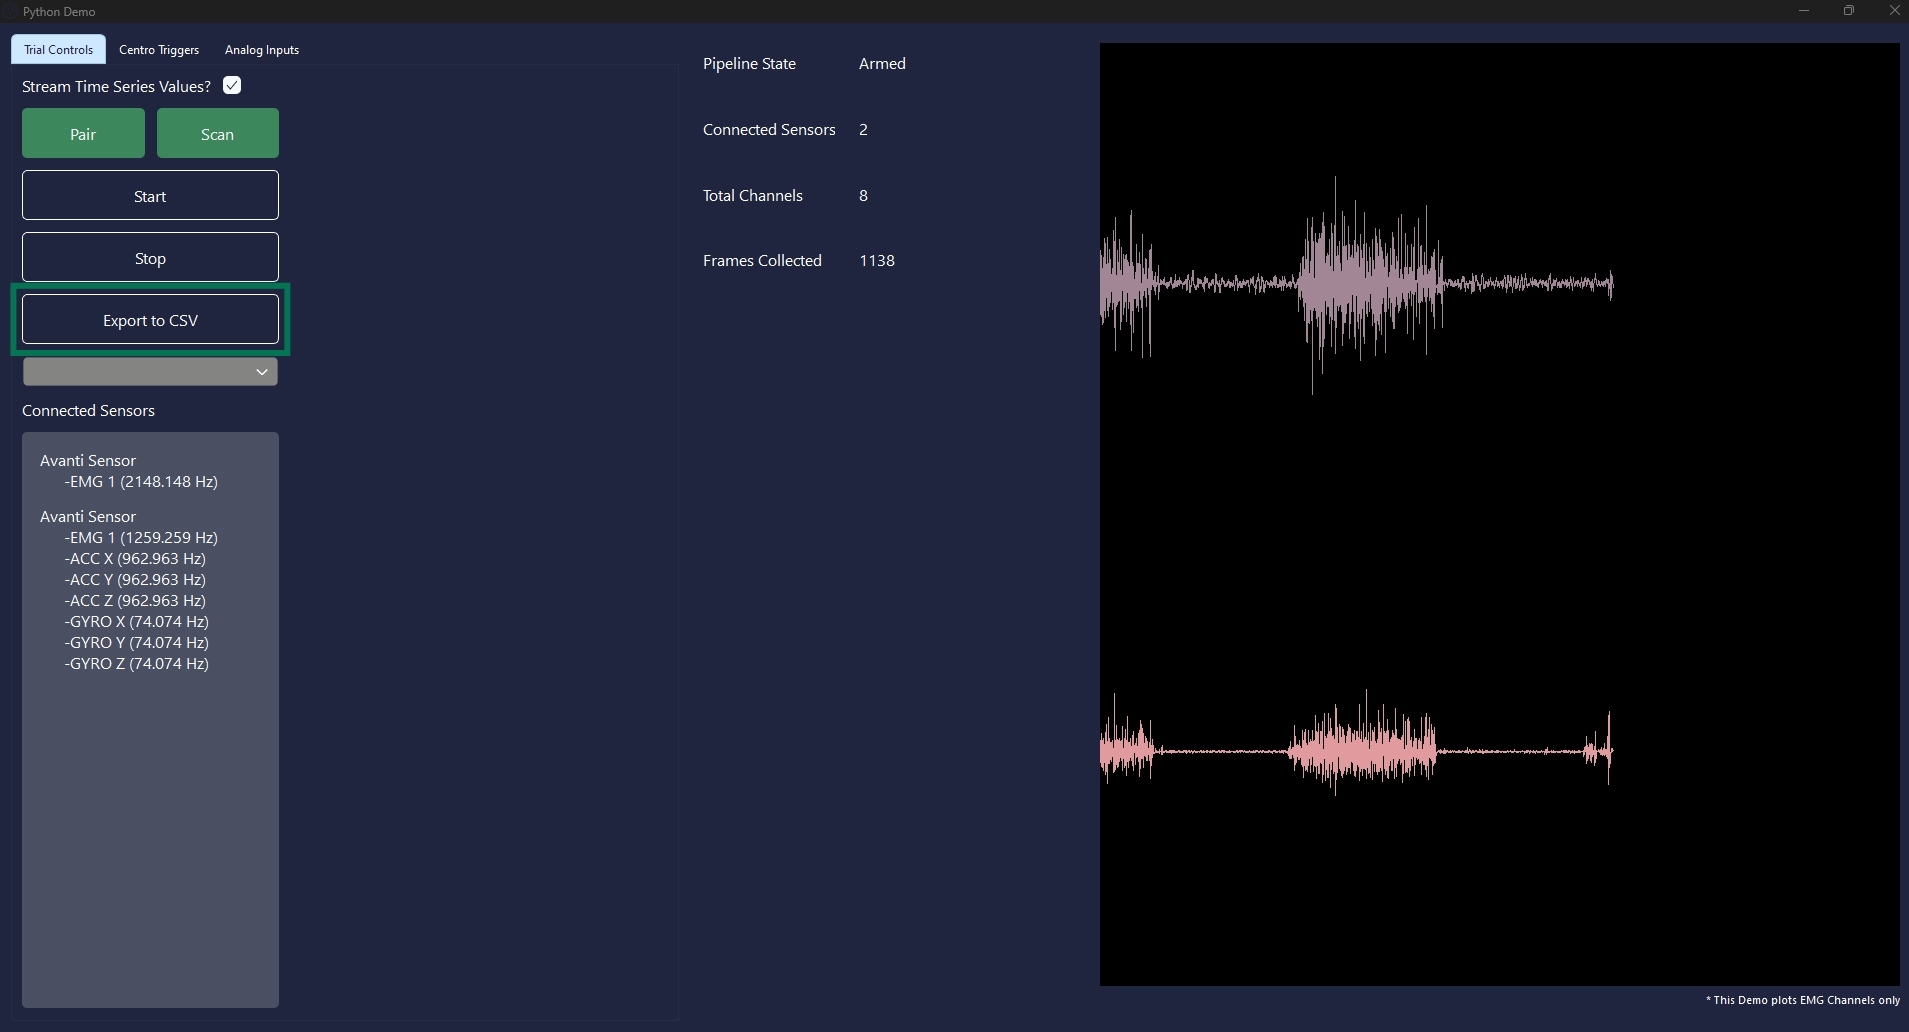
To export to CSV, first stop the data collection, then click the “Export to CSV” button.
If the export is successful, the terminal will display "CSV Export: True".
The data file will be saved within the Python folder in your directory with the default name "data.csv".
To change the file name, close the Delsys GUI and navigate to the
CSVWriter.pyfile under the Export section. Change the filename in line 5 and run theCSVWriter.pyfile. Navigate to theDelsysPythonDemo.pyto load the GUI and start a new collection.
Important
The export CSV function is an example of how to save data. It is not an optimal project solution for saving data.
Information
The GUI needs to be closed out before renaming a trial for a new data file to be created. To save multiple trials of data streams, the filename needs to be changed. Otherwise, the same "data.csv" file will be overwritten. In addition, any exported API CSV file needs to be closed out.
Troubleshooting Guide
For a documented FAQ guide, please refer to the Delsys Python Example: Getting Started Guide.
Issues | Solution |
|---|---|
Error: "Trigno system not found" when starting GUI | This error is due to a Trigno System not being plugged in via USB to the computer. The Trigno Research Base Station, Trigno Lite, or Trigno Centro needs to be plugged into the computer used for data collection. |
Error: "Base has out-of-date firmware” | There are three possible reasons for this error to occur: 1. This error can be due to the Trigno Research Base Station being on the wrong driver. The Windows PC needs to be on the 64-bit driver in order to communicate with the Delsys API and the Trigno Research Base Station. 2. Multiple open Delsys software instances can cause interference with one another. So, all other Delsys software should be closed. In addition, ensure that only one GUI window is open during use of the Delsys API, as multiple GUI windows will also cause this error. 3. If the firmware is out of date for the Trigno Research Base Station. To use the Delsys API you must be on the below firmware. Trigno Research Base Station: Digital: 2919 | 1506 | 0806 | 2008 | 0000 Analog: 2919| 1506 | 0806 | 2008| 0901 For more information on changing firmware and switching drivers, refer to our How to Change USB Drivers and Trigno Compatibility Guide articles. |
DOC-684-1-0